Lesson 19 Video

You must have the Adobe Flash Player installed to view this player.

Lesson 19

Lesson 19 - F Major Chord

F Major Chord

♦ Learn the proper fingering for the F major chord
♦ Play the chord clearly
♦ Visualize the chord pattern

Now it’s time to learn our next chord which is the F major chord.

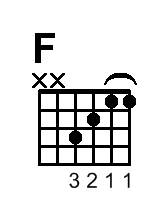
The F chord is formed with the 3rd finger on the 3rd fret of the 4th string, the 2nd finger on the 2nd fret of the 3rd string, and the 1st finger “barring” the 1st fret of the 1st and 2nd strings.

It is the barring of the 1st and 2nd strings at the 1st fret that gives the most difficulty.

Note: The 6th & 5th strings are not played and should be muted.

Hint!

Notice the similar “pattern” when comparing the C and F chords.

The fingering position for the 2nd and 3rd fingers is identical, just on different strings. Also, the 1st fret of the 2nd string remains constant.

Changing from C to F is as easy as sliding the 2nd and 3rd fingers down one string (while maintaining position) and rolling the first finger over to barre the 1st and 2nd string.

This is a good point to remember because many songs will go from a C chord to an F chord as part of the progression. (Including our next one!)

19_c f comp diagram


Lesson 19 Summary

Take a few minutes to work on the F major chord. The chord should sound clear with no buzzing or fret noise. Also practice visualizing the chord pattern. You should be able to recall the chord pattern without looking at the chart.

Need Help?

Got a Question?

Lesson Help

Jam Tip!

This was one of the most difficult chords for me when I first started playing many moons ago. For some reason the F chord and I just didn’t get along. I think it may have had to do with the fact that there are two strings to press down with the 1st finger – it takes a little pressure to get it to sound right. If you are having difficulty with the F chord just keep working on it and it will eventually come to you!

F Chord

19_f chord diagram

F Chord

19_f chord pic 01