Reading Chord Diagrams
One important aspect when beginning guitar lessons is to learn how to read a chord diagram. They are not overly complicated and after reading this tutorial you will have no problem understanding one.
A chord diagram is simply an easy way to display the fingering pattern for chords on the guitar. It consists of a series of horizontal and vertical lines, dark dots, open dots, “x”‘s, fingering numbers and the chord name.
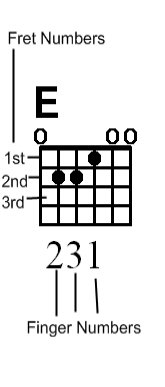
Look at the first diagram. There is a large letter at the top part of the diagram. In this case it is an “E” so the diagram is displaying an E major chord.
There are a series of 6 vertical lines. These represent the 6 strings on the guitar. The line to the far right represents the 1st string, or high E string. Then they follow sequentially from 1st string to the 6th string (right to left). The low E string or 6th string (the thickest string) is on the far left.
The horizontal lines represent the frets, and the thickest horizontal line toward the top of the diagram represents the “nut” of the guitar. (See “Parts of the Guitar”)
The black dots on the diagram display which notes are to be played to form a particular chord.
The open dots, or circles, above the “nut” indicate that the open string should be played.
Sometimes there will be numbers at the lower part of the diagram and these indicate which fingers should be used to play the corresponding dot above. (see “Identifying Fret & Finger Numbers”)
To sum it up, this first diagram is displaying an “E” major chord, which is formed by playing the note on the 2nd fret of the 5th string with the 2nd finger – the note on the 2nd fret of the 4th string with the 3rd finger – the note on the 1st fret of the 3rd string with the 1st finger – and the 1st, 2nd and 6th strings are played open.

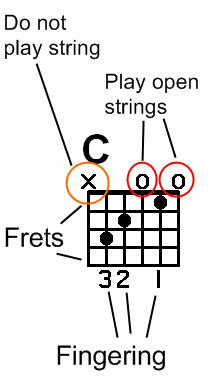
The next diagram displays a “C” chord. In this example the chord is formed by playing the note on the 3rd fret of the 5th string with the 3rd finger – the note on the 2nd fret of the 4th string with the 2nd finger – the note on the 1st fret of the 2nd string with the 1st finger – and the 3rd and 1st strings are played open.
It is also important to note that on this particular chord there is an “X” above the 6th string. That means that the 6th string should not be played or it should be muted.
As you can see, reading chord diagrams is not too difficult. Spend some time looking over these examples and be prepared to see similar diagrams a lot throughout the course.
Please do not hesitate to contact us with any questions.


