Identifying Fret & Finger Numbers
In order to communicate guitar lessons material clearly it is necessary to have a system in place by which we can identify some of the major items involved in playing guitar.
We learned earlier how to identify the guitar strings by number (1-6) with the 1st string being the high E string. (See “Naming the Open Guitar Strings”)
We will also assign a numeric identifier to each fret on the guitar and each finger of our left hand (for right handed players).
From a technical standpoint, the frets on a guitar are the metal wires embedded into the fret board. From a practical point of view, however, when we refer to frets we are referring to the area of the fret board directly behind the metal fret.

As you can see from the diagram, you start with the fret that is at the end of the neck, closest to the nut. (See “Parts of the Guitar”) That is called the 1st fret, and the rest are numbered sequentially up the neck.
There are a couple of points to note about the fret numbering. First, notice that there are dots on the fret board, or “position markers”, at the 3rd, 5th, 7th, 9th frets, and a double marker at the 12th fret. These dots are there to help you quickly locate a fret and your position on the neck. These will be very useful to you later on.
Secondly, look at the 12th fret that has 2 position marker dots. These 2 dots indicate that you have reached the octave point of the guitar neck. This means that the note value of the open strings have come full circle and will start over in a higher range. For example, the open 6th string is an “E” note and upon reaching the 12th fret of the 6th string you arrive at “E” again. This is known as the “octave” note.

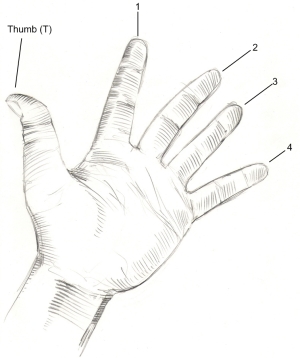
As with the guitar strings and frets on the neck, we also assign a numeric value to the fingers of the left hand (for right handed players) so that we can discuss clearly where to put the fingers.
This is fairly straightforward. The first finger is # 1, middle finger is # 2, third finger is # 3 and the pinky is # 4. Please make a note of this because it will come up repeatedly in future lessons.
To put this all together in a real life example – you will quite often hear something like “put your 2nd finger on the 4th fret of the 3rd string”, or, “the E chord is formed by placing your 2nd finger on the 2nd fret of the 5th string, your 3rd finger on the 2nd fret of the 4th string and your 1st finger on the 1st fret of the 3rd string”.
As you can see, this is far from rocket science. But having a good understanding of this material will make your early days of guitar lessons go much more smoothly.
Please do not hesitate to contact us if you have any questions!


