Lesson 2 Video

You must have the Adobe Flash Player installed to view this player.

Lesson 2

Lesson 2 - E Chord Strumming

E Chord Strumming

Lesson Goals:

♦ Learn the right hand down stroke technique
♦ Learn the right hand up stroke technique

♦ Become familiar with the music staff and notation

♦ Learn alternating down and up stroke pattern

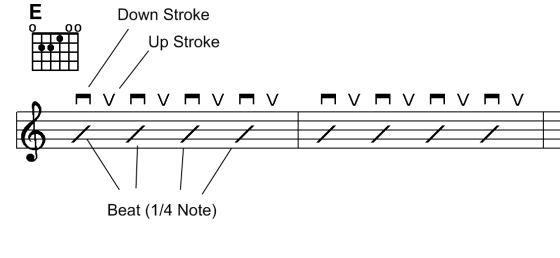
Now that we know how to form the E chord we can begin working on learning strumming techniques.

Start by practicing down strokes as illustrated to the right. For now just work on getting smooth strokes with all 6 strings ringing clearly.

Do this slowly and keep a steady tempo to begin with and then you can gradually speed up.

Next we will work on up strokes. Again, we are not too concerned with speed at this stage. Just play them slow and at a steady tempo until you feel comfortable with the movement.

Now we can put this all together! In the following example we will practice alternating between down strokes and up strokes.

.

Chord Chart

If you are unfamiliar with this type of chart don't worry. We will break it down into its 3 main elements and you will see how easy it is to understand.

1. Chords
2. Music Staff
3. Strumming Pattern

Chords - You should already be familiar with a chord diagram from Lesson 1. Throughout the course you will see these as we introduce new chords.

Music Staff - The 5 horizontal lines represent the staff. The staff is then divided with vertical lines into measures. Within each measure contains a certain number of beats which will vary according to the song.

Strumming Pattern - The figures directly above the staff that resemble a "staple" are the symbols for down strokes. The symbols that resemble a "V" represent an up stroke.

2_e strumming diagram

In this example, there are 4 beats per measure. But, there are actually 8 strokes in each measure (4 down strokes and 4 up strokes). How do we play this?

Solution: Each down stroke in this example represents one of the 4 main beats in every measure. The up strokes are in between the beats. If you were counting this out loud you would say oneon the down stroke and and on the up stroke. In other words, if you were verbalizing the above measure you would say:

“one, and, two, and, three, and, four, and”.

The “one”, “two”, “three” & “four” being the 4 main (down stroke) beats – and the “and’s” being the in between up strokes.

Practice playing the above passage. Each measure has 4 beats and each beat has 2 strokes (1 down & 1 up). Start slow and steady then gradually speed up as you get comfortable.

Lesson 2 Summary

Although strumming may feel a little awkward right now you will find that with just a little practice it will start to feel natural. One thing that will help is to focus a little less on the "mechanics" of strumming and a little more on "feeling" the music. In time it will become second nature!

Need Help?

Got a Question?

Lesson Help

Jam Tip!

The key to good strumming is to keep a fluid motion with the right forearm. The upper arm should remain in position resting on the top of the guitar body allowing free movement of the forearm. The right hand should strike the strings across the area of the sound hole on an acoustic or mid body on an electric. The right wrist should stay flexible.

Down Stroke

2_strum down pic

Up Stroke

2_ strum up pic

Exercise

Play 8 slow and steady down strokes followed by 8 slow and steady up strokes. Continue alternating while gradually increasing speed but always remain in tempo.