Tablature, or TAB for short, is a simple means of notating guitar licks, riffs, chords and scales without having to read musical notes on a staff.
Tablature is laid out in a format of six horizontal lines, each representing a string on the guitar. The top line on a TAB represents the 1st string or high "E" string.
The horizontal line on the bottom of the TAB represents the 6th string or low "E" string.
A TAB diagram is not to be confused with a Chord Diagram, which is designed to show the formation of chords only, and is laid out in a different format. See "Reading Chord Diagrams".
There are numbers on a TAB diagram that represent the "fret" that is to be played. (not the fingering) For example - the number "2" on the vertical line that is the third one down from the top, would indicate that the 2nd fret of the 3rd string is to be played.
TAB diagrams are read from left to right. The first note in the piece is the note on the far left, and the following notes are played sequentially, from there to the right.
Look at the following TAB diagram.
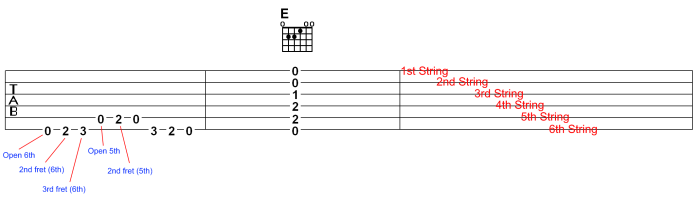
In the first measure of the above TAB, the first note is the open 6th string - followed by the note on the 2nd fret of the 6th string - followed by the note on the 3rd fret of the 6th string. Then the riff moves on to play notes on the 5th string, and finishes the riff back on the 6th string.
The second measure of the above TAB example shows what a chord looks like when notated on TAB. In this example there is also a chord diagram above the TAB.
The third measure of the above TAB example shows which strings on the guitar the vertical lines correspond to.
Now take a look at the next TAB example below.

The first measure above illustrates a descending "E" pentatonic blues scale. In this example, the first note is on the 3rd fret of the 1st string - followed by the note on the open 1st string - followed by the note on the 3rd fret of the 2nd string - followed by the note on the open 2nd string - and so on.
The second measure above illustrates the notation for a "Hammer On", as indicated by an "H" - a "Pull Off", as indicated by a "P" - and a string bend, as indicated by an "up" arrow. The "1/4" next to the arrow indicates the "degree" of the bend. In this case you would do a "quarter" bend on the 3rd fret of the 6th string.
In our lessons course you will see TAB quite a bit and you probably already realize what a great way this is to communicate licks, riffs, chords and scales in "guitar talk" so that any guitarist reading it would understand.
Take a moment to get familiar with TAB notation and please do not hesitate to contact us with any questions!
One important aspect when beginning guitar lessons is to learn how to read a chord diagram. They are not overly complicated and after reading this tutorial you will have no problem understanding one.
A chord diagram is simply an easy way to display the fingering pattern for chords on the guitar. It consists of a series of horizontal and vertical lines, dark dots, open dots, "x"'s, fingering numbers and the chord name.
Look at the first diagram. There is a large letter at the top part of the diagram. In this case it is an "E" so the diagram is displaying an E major chord.
There are a series of 6 vertical lines. These represent the 6 strings on the guitar. The line to the far right represents the 1st string, or high E string.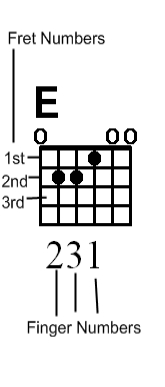 Then they follow sequentially from 1st string to the 6th string (right to left). The low E string or 6th string (the thickest string) is on the far left.
The horizontal lines represent the frets, and the thickest horizontal line toward the top of the diagram represents the "nut" of the guitar. (See "Parts of the Guitar")
The black dots on the diagram display which notes are to be played to form a particular chord.
The open dots, or circles, above the "nut" indicate that the open string should be played.
Sometimes there will be numbers at the lower part of the diagram and these indicate which fingers should be used to play the corresponding dot above. (see "Identifying Fret & Finger Numbers")
To sum it up, this first diagram is displaying an "E" major chord, which is formed by playing the note on the 2nd fret of the 5th string with the 2nd finger - the note on the 2nd fret of the 4th string with the 3rd finger - the note on the 1st fret of the 3rd string with the 1st finger - and the 1st, 2nd and 6th strings are played open.
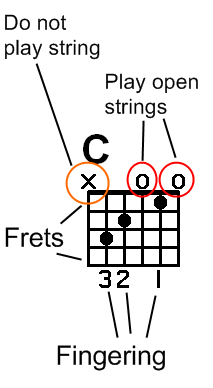
The next diagram displays a "C" chord. In this example the chord is formed by playing the note on the 3rd fret of the 5th string with the 3rd finger - the note on the 2nd fret of the 4th string with the 2nd finger - the note on the 1st fret of the 2nd string with the 1st finger - and the 3rd and 1st strings are played open.
It is also important to note that on this particular chord there is an "X" above the 6th string. That means that the 6th string should not be played or it should be muted.
As you can see, reading chord diagrams is not too difficult. Spend some time looking over these examples and be prepared to see similar diagrams a lot throughout the course.
Please do not hesitate to contact us with any questions.
One of the most frustrating aspects of playing guitar for new students can be learning how to tune. Most understand the mechanics of how to adjust the tuners to change the pitch of the string, but there is always a question about whether or not it was done properly.
The first recommendation we would make to you is to purchase an electronic tuner. Digital tuners can be purchased for about $10 and up so should be within any budget. They are easy to use and battery operated so they can be taken anywhere. They are
 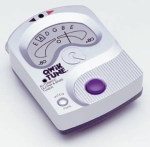 also very accurate and, if used properly, you can rest assured that you will always be in tune.
Tuning is obviously important because and out of tune guitar will never sound right, so it is a good idea to get in the habit of tuning every time you sit down to play the guitar. Strings have a habit of going sharp or flat in reaction to environmental and temperature changes and a guitar that was in tune yesterday may very well have slipped out today.
In case you are unfamiliar with the mechanics of tuning, there are 6 “tuners” attached to the headstock of the guitar, and a string is attached to each of these tuners. (Refer back to the page on “Parts of the Guitar”)
By turning the knob of a tuner in one direction you will tighten the string and cause the pitch of the note to go higher (sharp), and by turning the knob in the opposite direction you will loosen the string and cause the note to go lower (flat). When using an electronic tuning device we simply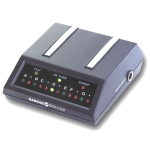 adjust the tuner (on the headstock) of the string until the meter or needle of the electronic tuning device indicates the string is in proper pitch.
If an electronic tuner is not available, or your batteries go out, it is good to know how to tune your guitar the “old school” way. Manually by ear.
The first step in tuning the guitar manually is to get a reference note for at least one of the strings on the guitar, preferably the low E string, but any string will do. You can get a reference note from a piano, pitch pipe or tuning fork. You can also go online at various sources.
In this example we will assume that your low E (6th string) is in proper pitch and now all we must do is match the other stings up to that.
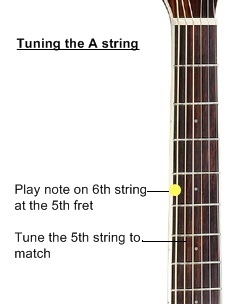 Once the low E is in tune, play the note that is on the 5th fret of the low E string. That note (which is an A) should sound exactly the same as the open 5th string (our A string). If the open 5th sting sounds different than the note on the 5th fret of the low E string then adjust the open A (5th) string until it sounds the same.
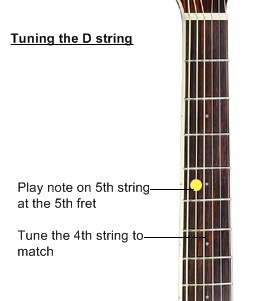
Once the open A (5th) string is in tune simply repeat the process on that string by playing the note on the 5th fret of the A string to get the proper pitch for the D or 4th string.
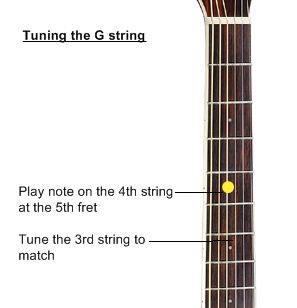
Once the open D (4th) string is in tune repeat the same process again, this time playing the note on the 5th fret of the D string to get the proper pitch for the G (3rd) string.
By now you can see a pattern developing in the tuning process but in this next step you will make one minor change.
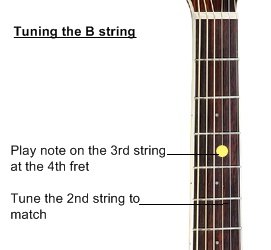 Once the G (3rd) string is in tune, play the note on the 4th fret (not the 5th!) to get the pitch for the open B (2nd) string. This is the only different one to be concerned with.
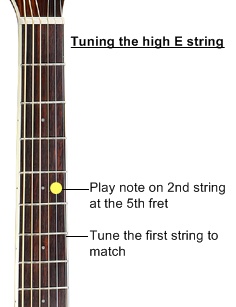
And lastly, once the open B (2nd) string is in tune go back and play the note on the 5th fret of the B string to get the pitch for the open E (1st) string.
This is a little more work than using an electronic tuner, but try to practice this method and get used to it because it will really help train your ears to hear the notes on the guitar. It will also come in handy if something happens and you find yourself without your electronic tuner.
Just keep working at it and before you know it you'll be tuning your guitar like a pro!