
E, A & B7 Chord Progression
Lesson Goals:
♦ Review finger positions for the E, E7, A and B7 chords
♦ Learn new alternate strumming pattern
♦ Play the full chord progression smoothly and in tempo
In this lesson we are going to put the E chord (along with E7), A chord and B7 chord together in preparation for our next song.
Let’s take a look at the following diagram. This is an exaggerated illustration of just one measure. We will do this first one with only an E chord so we can focus on the right hand strumming technique.
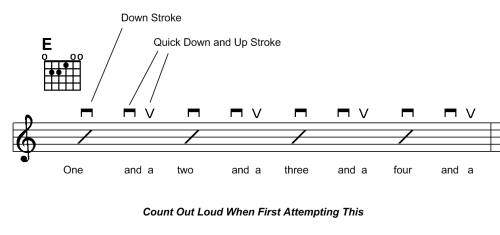
In this strumming pattern we play a down stroke on the main beat and then a quick down and up stroke in between the main beats.
Try verbalizing this pattern without the guitar by tapping your foot. When your foot touches the floor say “one”, and when your foot lifts off the floor say “and a” like this:
“one, and a, two, and a, three, and a, four, and a”
Now do it with the guitar. On the “one” you play a full down stroke. On the “and a” you play a quick down stroke on the “and” then a quick up stroke on the “a”.
Do this very slowly to begin with until you are comfortable with it. Take your time, this is a very important strumming pattern that you will use many times later on so don’t try to rush this one too much.
Now let’s take everything we just learned and put it into our new chord progression. Look at the following chart. The strumming pattern throughout this is the same as the one we just completed only now we have added a few more chords.
Try playing it and listen to how it sounds.
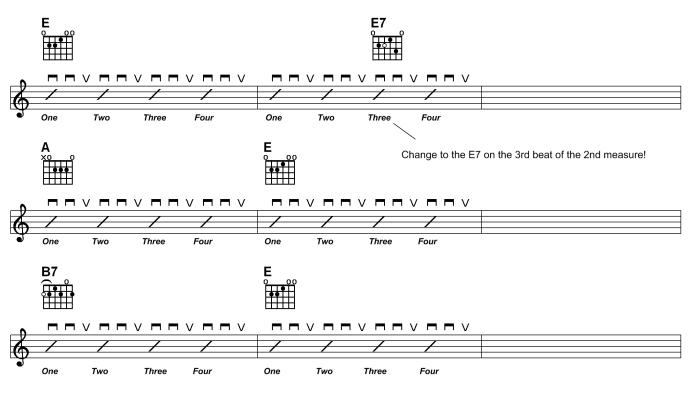
Note: You may have noticed an extra note on the chord diagrams for the E7 and B7 chords. These notes would be played using the 4th finger and are optional. We have included these for you to expand the tonal range of the chords if you want to!